Installing a wood-burning stove is a fantastic way to bring warmth and charm into your home, offering both an eco-friendly and cost-effective way to heat your space. However, proper preparation is key to ensuring the installation goes smoothly and the stove operates safely and efficiently. Whether you’re a seasoned DIYer or plan to hire a professional, getting your home ready for a wood-burning stove requires thoughtful planning and a focus on safety.
In this guide, we’ll walk you through the essential steps to prepare your home for the installation of a wood-burning stove. We’ll cover everything from choosing the right location to meeting safety requirements, and provide tips on selecting high-quality stoves and installation materials. For those looking for top-notch products, Caledonian Stoves offers a wide range of stoves, hearth materials, and accessories to help you get started.
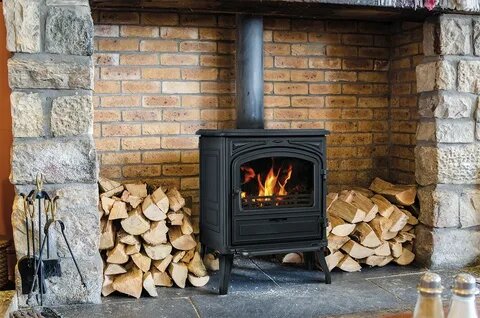
Step 1: Choose the Right Wood Burning Stove
Before preparing your home for Wood burning stove installation, it’s important to choose the right wood-burning stove that fits your heating needs and space. Selecting the right model ensures efficient heating and complements your home’s aesthetic.
- Size and Heat Output: The size of the stove should match the size of the room or area you plan to heat. Wood stoves are rated by their heat output, measured in British Thermal Units (BTUs). For a small space, a stove with a lower BTU rating may be sufficient, while larger spaces may require a higher output.
- Efficiency Rating: Look for a stove with a high-efficiency rating. An efficient stove uses less wood to produce more heat, which saves you money and reduces emissions. Caledonian Stoves offers high-efficiency models that meet environmental standards.
- Style and Design: Wood-burning stoves come in various styles, from classic cast iron to contemporary designs. Choose a model that fits seamlessly with your home’s decor.
Step 2: Choose the Installation Location
Once you’ve chosen the right stove, the next step is to decide where it will be installed. The location is crucial for both the stove’s performance and your home’s safety. Ideally, the stove should be placed in a central location for even heat distribution, but there are other factors to consider as well.
- Central Placement: Installing the stove in a central part of your home allows heat to radiate evenly. Living rooms, open-plan spaces, or large kitchens are common choices.
- Clearances and Combustibles: Wood stoves must be installed a safe distance away from combustible materials, such as walls, furniture, curtains, and rugs. Most stoves require a minimum clearance of 36 inches from combustibles. Heat shields can reduce the required clearance and provide additional protection.
- Floor Protection: Wood-burning stoves must be placed on a non-combustible hearth, such as stone, brick, or tile. The hearth protects the floor from heat and sparks, and it must extend at least 18 inches in front of the stove and 12 inches on either side.
Caledonian Stoves provides a wide selection of hearth materials to suit your style while ensuring safety compliance.
Step 3: Plan for Chimney or Flue Installation
Proper ventilation is essential for the safe operation of a wood-burning stove. The stove must be connected to a chimney or flue that vents smoke and gases out of your home. If your home already has a chimney, it may be possible to connect the stove to it. If not, you’ll need to install a new chimney or flue.
- Existing Chimney: If your home has a masonry chimney, you’ll need to have it inspected to ensure it’s safe for use with a wood-burning stove. Often, a stainless steel chimney liner is required to improve draft and prevent creosote buildup.
- New Chimney or Flue: For homes without a chimney, you’ll need to install a twin-wall insulated flue system. This type of flue can run either vertically through the roof or horizontally through an exterior wall. Make sure the flue is properly insulated to maintain a strong draft and prevent condensation.
Caledonian Stoves offers a range of high-quality flue systems and chimney liners to ensure your stove vents safely and efficiently.
Step 4: Meet Local Building Codes and Permits
Before installing a wood-burning stove, it’s essential to check your local building codes and obtain any necessary permits. Building codes are in place to ensure your installation meets safety standards, protecting your home from fire hazards.
- Permits: In most areas, you’ll need a permit to install a wood-burning stove. This is typically required for both DIY installations and professional installations. The permit process ensures that your installation complies with local fire and building safety regulations.
- Building Codes: Local building codes often specify the minimum clearance requirements for walls, floors, and ceilings. They may also regulate the type of flue system you can install and how it should be vented. Make sure to adhere to these guidelines to avoid fines and ensure your stove is safe.
Step 5: Prepare the Installation Area
Once you’ve chosen a location and obtained any necessary permits, it’s time to prepare the installation area. This involves setting up the hearth, protecting surrounding walls, and ensuring the area is ready for the stove.
- Install the Hearth: The first step is to install a non-combustible hearth that meets clearance requirements. Choose a material like stone, brick, or tile that can withstand high temperatures. Make sure the hearth extends far enough to protect the floor from heat and sparks.
- Protect the Walls: If the stove will be installed near a wall, you’ll need to protect the wall from heat. This can be done by installing a heat shield or fire-resistant wall panels. Heat shields are often made from metal or fireproof materials, and they can significantly reduce the clearance required between the stove and the wall.
- Clear the Area: Remove any combustible materials, such as curtains, rugs, or furniture, from the area around the stove. Ensure that there is enough space for airflow and proper ventilation.
Step 6: Install Smoke and Carbon Monoxide Detectors
Safety is a top priority when using a wood-burning stove, and installing smoke and carbon monoxide detectors is a must. These detectors can alert you to dangerous conditions, such as a fire or carbon monoxide buildup.
- Smoke Detectors: Install a smoke detector in the same room as the wood-burning stove, as well as in other rooms of your home. Test the detectors regularly to ensure they are functioning properly.
- Carbon Monoxide Detectors: Carbon monoxide (CO) is an odorless, colorless gas that can be deadly. Install a CO detector near the stove and in bedrooms to protect against CO poisoning. Make sure to test the detectors periodically and replace the batteries as needed.
Step 7: Plan for Proper Ventilation
Wood-burning stoves require proper ventilation to function efficiently and safely. Adequate ventilation ensures that fresh air is available to feed the fire, and it prevents the buildup of smoke and dangerous gases.
- Air Supply: Some wood-burning stoves require an external air supply, especially in newer homes that are tightly sealed for energy efficiency. You can install a fresh air intake vent that brings air from outside directly to the stove, preventing negative pressure and ensuring proper combustion.
- Room Ventilation: Ensure that your home has adequate ventilation by opening windows occasionally to allow fresh air in. This is especially important during the initial lighting of the stove and during periods of heavy use.
Step 8: Test the Stove After Installation
Once the stove is installed and connected to the chimney or flue, it’s important to test it to ensure everything is working properly. Start by lighting a small fire using dry kindling and monitor the stove’s performance.
- Check for Smoke Leaks: During the test fire, check for any signs of smoke leaks around the stovepipe or chimney connection. If you notice smoke entering the room, seal any gaps with high-temperature sealant.
- Test the Draft: Ensure the chimney or flue is creating a strong draft by observing how well the fire burns. If the fire struggles to stay lit or if smoke isn’t venting properly, you may need to adjust the flue or check for blockages.
Conclusion
Preparing your home for wood-burning stove installation is a crucial step toward enjoying the warmth and efficiency a stove can provide. By choosing the right stove, planning the installation area, and meeting safety standards, you can ensure a safe and efficient setup that will serve your home for years to come.
For the best wood stoves, chimney systems, and installation materials, Caledonian Stoves is the go-to source for quality products. With a wide selection of stoves and expert advice, they have everything you need to prepare your home for a successful installation.
Read More: Nytimer